Most computers that are attached to an Ethernet network will have their IP addresses assigned automatically by DHCP. You can configure your PC to use its own IP address, effectively disabling DHCP. Here’s how to do that in Windows 7:
- Open the Network and Sharing Centre window.
- On the right side of the window, choose the link Local Area Connection.
- In the Status dialog box, click the Properties button.A Properties dialog box for the connection appears. It lists the various protocols and services being used by the connection.
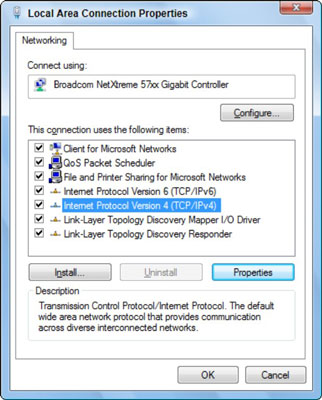
- Select the service titled Internet Protocol Version 4 (TCP/IPv4).
- Click the Properties button.The dialog box labeled Internet Protocol Version 4 (TCP/IPv4) Properties appears.
- Choose the option Use the Following IP Address.
- Type the IP address.At this point, you must know what you’re doing. Seriously. Typing an improper IP address, or one that’s out of range, means that your computer cannot use the network.
- Type a subnet mask.For a local-area network, the value is usually 255.255.255.0, but it could be something else depending on the specifics of your network.
- Type the default gateway address.The default gateway address is the IP address for the network’s router.Because DHCP also obtains the address for the DNS server, which helps your computer find addresses on the Internet, you need to manually list those addresses as well.
- Type the address of the preferred DNS server.This value is obtained from your ISP.
- Type the address for the alternative DNS server.The alternate DNS server’s IP address is also something that your ISP must provide.
- Click OK to close the Internet Protocol Version 4 (TCP/IPv4) Properties dialog box.
- Close the other open dialog boxes and windows.
No comments:
Post a Comment